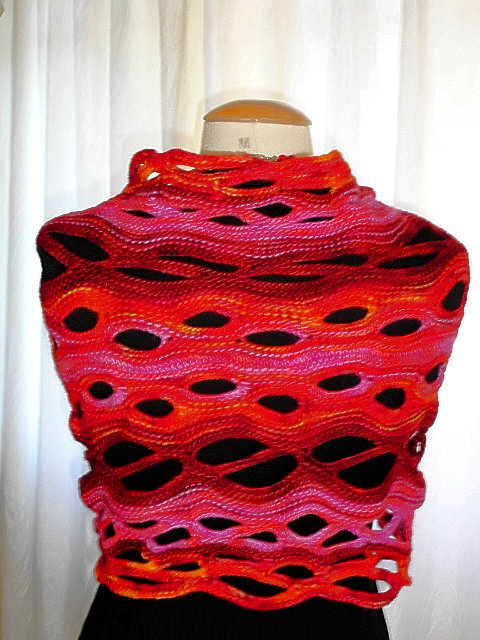
Finally I finished "it"! And now I need a proper name for my Moebius Wrap.
Because of the mishap that came with the cast-off, I'm leaning towards the names "Two-time Toe Loop" or "Double-Knigth Salvager. Like I have noted with my perkily Blossom Feet:
"When it does not seem like so, then be flexible ..."?
Very well, if you trust me with my guide, achtet bitte auf das Schließen der Anschlagrunde und vergewissert Euch bitte bei seriösen Möbius-Strickanleitungen.
Not as elegant as ice-skating...my new one turned out with two twists - oops! How I got around to that is still not very clear to me but it happened. With a lot of optimism I however recognised immediately the advantages that came with it. The thing finally holds on to your breasts and doesn't constantly slip down. I can drape it as I want (and not only on myself) and then I can remember another episode from Forrest Gump: "Shit happens".
Oh well, if you trust me on my instructions, then please watch out when you're joining to knit in the round and do some research on other proper Moebius instructions.

Before we start really, we should use the one-row button holes to the FF:
Take the test button holes Remnants of yarn, this button holes separated only with difficulty.
For Probefleckerl, we knit 20 or more stitches, and a few rows to keep enough mass in the hands, we can skip us.
For the first 10 stitches buttonholes, to put it in the middle, to knit five stitches. This is the pole position for the start: Before we begin
, we should be able to do the one-row button holes first: Take some waste yarn for the sample button holes, button holes are generated because rally hard to frog. For this sample, we'll cast-on stitches and knit about 20 + for a few rows, so that we have enough fabric to hold in the hand, On which we can experiment. For the first 10 button-hole stitch, 5 stitches will be knit so that it will sit in the middle. This is the pole position for the beginning:
first stitch as to knit left-lift. The thread is in front of the needle and is guided around the front stitch left around to be between this and the following stitch left hanging behind. We applaud this thread not look at everything and keep him no longer in his hand. front
Slip the first stitch purl-wise with the yarn in. The yarn will be wrapped around the fron of the slipped stitch and will be come to rest in the back, between this slipped stitch and the next un-knit stitch. We're not going to bother with this yarn anymore and wants to leave it hanging there.
Our first stitch is bound off on the next stitch, in which we simply go about it. In exactly the same way we deal with ten stitches.
is now turned over the garment, the forgotten little thread is left of us. We take it up again and stand on the left hand needle between the last and second last stitch around the filaments to pull out and take it as a new stitch to left needle. This process is repeated 11 times!! No, nicht nur 10mal! Die Extramasche braucht man um sie als Übergang oder Verbindung bei der Knopflochanschlußstelle über die nächste Masche zu stülpen.
The first (slipped) stitch will be passed over the second (i.e. bound off). And with the same method we will bind off 10 stitches altogether. Turn your work. The working yarn will be hanging to the left. We will now take it up again. Insert the needle between the last two stitches, make a loop of the working yarn around the needle and take it to the front in order to make a new stitch. Repeat this processs 11 times! No, not only 10 times!! The extra stitch is needed as a connection to the closing point of the button hole to put over the next stitch.
That was a few words, the single row button hole. Knit a few rows above and control if it looks like a button hole. With uncertainty instead look again at the video of www.knittinghelp.com , the perfect side information for many other knitting mysteries.
That was the concise version of the one-row button hole. Knit a few rows over it and check to see Whether it looks like a button hole. If you're not sure, go check out the video from www.knittinghelp.com , the perfect site for explanations on knitting mysteries.
Equipment:
Ca. 200-300g wool with the length of 200m/100g (to work depending on how many button holes), a 120 cm long circular needle force 5, a stitch marker.
Equipment: g
Approximately 200-300 g of wool with the yardage of about 200 m / 100 (depending on how many button holes shoud be in it), one 120 m long circular knitting needles size 5 mm ; one stitch marker.
The exact instructions for my red knit Wrap:
The distribution of the buttonholes, so I made them is not mandatory and not identical with the first wrap. Distributes them according to your own taste sensation. Very nice also symmetrically placed holes would look like two rows, or build you a huge button holes at the points in order to use them as armholes.
The exact knitting instruction for my red Wrap:
The distribution of the button holes as I did it is not strictly Necessary and it is not even identical to my first wrap. Just distribute them according to your taste. Symmetrically distributed holes in every second row would also look very pleasing. Or just put in giant buttonholes in the proper places and use those as arm holes.
stop 210 stitches on two needles in the color of Sleeping Beauty.
hold the stop just as you would close the round and start from the fixed stop edge 210 also meshes. On the needles now are 420 stitches and a rotation is apparent. Beginning and end of the round with a stitch mark.
over 2 needles in the colourway "Sleeping Beauty". The cast-on should be held as though you're going to join for the round, pick up and knit another 210 stitches from the cast-on edge. There should be 420 stitches on the needles altogether. You should be able to see a twist. Mark the beginning and the end of the round with a stitch marker.

1st row: Sleeping Beauty, right mesh
2nd round: Red hot chili, purl
3rd round: Red hot chili, right mesh
4th round: Red hot chili, purl
5.R: Sleeping Beauty, * 10 stitches, button hole on 10 stitches * repeat repeat
6.R: Red hot chili, purl
7th round: Red hot chili, right mesh
8th R: Red hot chili, purl
9.R: Red hot chili, * buttonhole over 10 stitches, 10 stitches *, repeat, repeat
10.R: Red hot chili, purl
11.R: Red hot chili, right mesh
12.R: Red hot chili, purl
13.R: Pomegranate, right mesh
14.R: Red hot chili, purl
15.R: Pomegranate, right mesh
16.R: Pomegranate, purl
17.R: pomegranate, right mesh
18.R: Pomegranate, purl
19.R: Pomegranate, repeat * 5 stitches, button hole on 15 stitches *, repeat
20.R: Pomegranate, purl
21.R: Pomegranate, * buttonhole over 15 stitches, 5 stitches * repeat repeat
22.R: Pomegranate, purl
23.R: Pomegranate, right mesh
24.R: Sleeping Beauty, purl
25.R: Pomegranate, right mesh
26.R: Sleeping Beauty, purl
27.R: Sleeping Beauty, right mesh
28.R: Pomegranate, purl
29.R: Sleeping Beauty, * 5, right stitches, button hole on 10 stitches *, repeat repeat
30.R: Sleeping Beauty, purl
31.R: Sleeping Beauty, * buttonhole over 10 stitches, 5 stitches *, repeat, repeat
32.R: pomegranate, purl
33.R: Pomegranate, right mesh
34.R: Pomegranate, purl
35.R: Red hot chili, * 10 stitches, button hole on 10 stitches *, repeat, repeat
36.R: Red Hot Chili , purl
37.R: Red hot chili, * buttonhole over 10 stitches, 10 stitches *, repeat, repeat
38.R: Red hot chili, purl
39.R: Red hot chili, * 5 stitches, button hole on 15 stitches *, repeat, repeat
40.R: Red hot chili, purl
bind off loose and Weave in ends
(can someone please tell how I can tame the line break?)
Row 1: Sleeping Beauty,
Row knit 2: Red hot chili, purl
Row 3: Red hot chili,
knit Row 4: Red hot chili,
purl Row 5: Sleeping Beauty, * k10, buttonhole over 10 stitches * repeat from * to *
Row 6: Red hot chili,
purl Row 7: Red hot chili,
knit Row 8: Red hot chili,
purl Row 9: Red hot chili, * Button hole over 10 stitches, K10 * repeat from * to * Row
10: Red hot chili,
purl Row 11: Red hot chili, knit
Row 12: Red hot Chili, purl
Row 13: Granatapfel, knit
Row 14: Red hot Chili, purl
Row 15: Granatapfel, knit
Row 16: Granatapfel, purl
Row 17: Granatapfel, knit
Row 18: Granatapfel, purl
Row 19: Granatapfel, *k5, button hole over 15 stitches* repeat from * to *
Row 20: Granatapfel, purl
Row 21: Granatapfel, *Button hole over 15 stitches, k5* repeat from * to *
Row 22: Granatapfel, purl
Row 23: Granatapfel, knit
Row 24: Dornröschen, purl
Row 25: Granatapfel, knit
Row 26: Dornröschen, purl
Row 27: Dornröschen, knit
Row 28: Granatapfel, purl
Row 29: Dornröschen, *k5, button hole over 10 stitches* repeat from * to *
Row 30: Dornröschen, purl
Row 31: Dornröschen, *Button hole over 10 stitches, k5* repeat from * to *
Row 32: Dornröschen: purl
Row 33: Granatapfel, knit
Row 34: Granatapfel, purl
Row 35: Red hot Chili, *k10, button hole over 10 stitches* repeat from * to *
Row 36: Red hot Chili, purl
Row 37: Red hot Chili, *Button hole over 10 stitches, k10* repeat from * to *
Row 38: Red hot Chili, purl
Row 39: Red hot Chili, *k5, button hole over 15 stitches* repeat from * to *
Row 40: Red hot Chili, purl
Bind off loosely and weave in all loose ends.
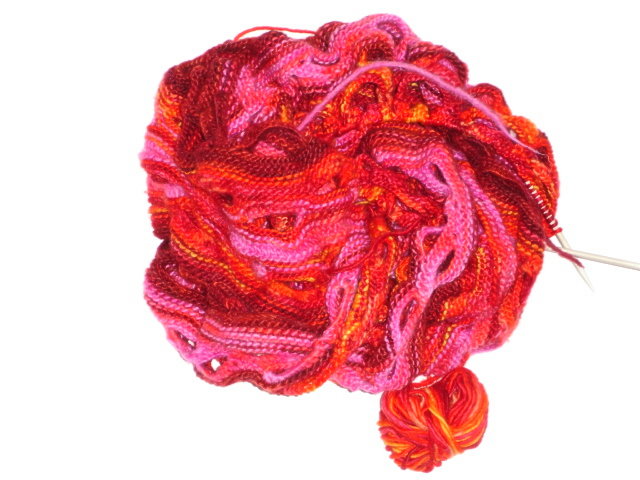
Such is the Mobius in during the development, an overwhelming Wollnestchen
The Moebius looks like this while it is being knit up to unmanageable nest wool.

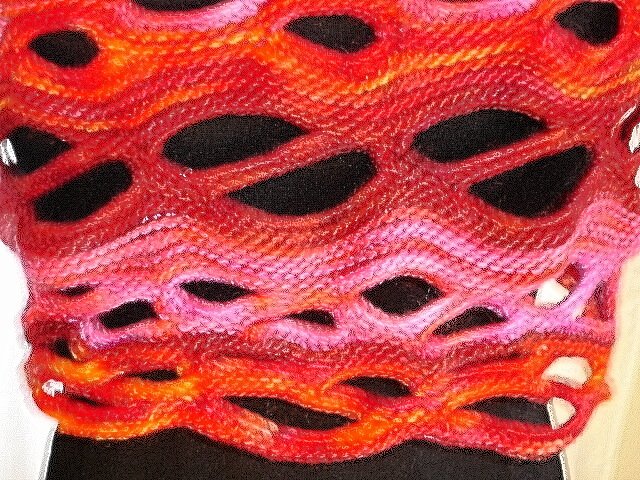
Mobius from behind and as a detail
Moebius from behind and as detailed
The detail image would be not necessary and is very fuzzy, but I just find it hot like chili.
The detail photo would not be Necessary and it is out of focus, but I think that it's as hot as chili!
With my clever sayings of the Blossom Feet I spare you. Begin simply and knitting problems, I try to help.
I'm going to exempt you from my Feet clever dicta about Blossom. Just cast on and if you have problem, I'll help you out.
Purified Wollmeise greetings
Greetings from the Wollmeise
0 comments:
Post a Comment